使用Hangfire+.NET 6实现定时任务管理(推荐)
目录
- 引入Nuget包和配置
- 编写Job
- Fire and Forget
- Continuous Job
- Scehdule Job
- Recurring Job
- Run
- 长时间运行任务的并发控制???
- Job Filter记录Job的全部事件
- 参考文章
在.NET开发生态中,我们以前开发定时任务都是用的Quartz.NET完成的。在这篇文章里,记录一下另一个很强大的定时任务框架的使用方法:Hangfire。两个框架各自都有特色和优势,可以根据参考文章里张队的那篇文章对两个框架的对比来进行选择。
引入Nuget包和配置
引入Hangfire相关的Nuget包:
Hangfire.AspNetCore
Hangfire.MemoryStorage
Hangfire.Dashboard.Basic.Authentication
并对Hangfire进行服务配置:
builder.Services.AddHangfire(c =>
{
    // 使用内存数据库演示,在实际使用中,会配置对应数据库连接,要保证该数据库要存在
    c.UseMemoryStorage();
});

// Hangfire全局配置
GlobalConfiguration.Configuration
    .UseColouredConsoleLogProvider()
    .UseSerilogLogProvider()
    .UseMemoryStorage()
    .WithJobExpirationTimeout(TimeSpan.FromDays(7));

// Hangfire服务器配置
builder.Services.AddHangfireServer(options =>
{
    options.HeartbeatInterval = TimeSpan.FromSeconds(10);
});
使用Hangfire中间件:
// 添加Hangfire Dashboard
app.UseHangfireDashboard();
app.UseAuthorization();

app.MapControllers();

// 配置Hangfire Dashboard路径和权限控制
app.MapHangfireDashboard("/hangfire", new DashboardOptions
{
    AppPath = null,
    DashboardTitle = "Hangfire Dashboard Test",
    Authorization = new []
    {
        new HangfireCustomBasicAuthenticationFilter
        {
            User = app.Configuration.GetSection("HangfireCredentials:UserName").Value,
            Pass = app.Configuration.GetSection("HangfireCredentials:Password").Value
        }
    }
});
对应的配置如下:
appsettings.json
"HangfireCredentials": {
  "UserName": "admin",
  "Password": "admin@123"
}
编写Job
Hangfire免费版本支持以下类型的定时任务:
- 周期性定时任务:
Recurring Job - 执行单次任务:
Fire and Forget - 连续顺序执行任务:
Continouus Job - 定时单次任务:
Schedule Job
Fire and Forget
这种类型的任务一般是在应用程序启动的时候执行一次结束后不再重复执行,最简单的配置方法是这样的:
using Hangfire;
BackgroundJob.Enqueue(() => Console.WriteLine("Hello world from Hangfire with Fire and Forget job!"));
Continuous Job
这种类型的任务一般是进行顺序型的任务执行调度,比如先完成任务A,结束后执行任务B:
var jobId = BackgroundJob.Enqueue(() => Console.WriteLine("Hello world from Hangfire with Fire and Forget job!"));
// Continuous Job, 通过指定上一个任务的Id来跟在上一个任务后执行
BackgroundJob.ContinueJobWith(jobId, () => Console.WriteLine("Hello world from Hangfire using continuous job!"));
Scehdule Job
这种类型的任务是用于在未来某个特定的时间点被激活运行的任务,也被叫做Delayed Job:
var jobId = BackgroundJob.Enqueue(() => Console.WriteLine("Hello world from Hangfire with Fire and Forget job!"));

// Continuous Job, 通过指定上一个任务的Id来跟在上一个任务后执行
BackgroundJob.ContinueJobWith(jobId, () => Console.WriteLine("Hello world from Hangfire using continuous job!"));
Recurring Job
这种类型的任务应该是我们最常使用的类型,使用Cron表达式来设定一个执行周期时间,每到设定时间就被激活执行一次。对于这种相对常见的场景,我们可以演示一下使用单独的类来封装任务逻辑:
IJob.cs
namespace HelloHangfire;

public interface IJob
{
    public Task<bool> RunJob();
}
Job.cs
using Serilog;
namespace HelloHangfire;
public class Job : IJob
{
    public async Task<bool> RunJob()
    {
        Log.Information($"start time: {DateTime.Now}");
        // 模拟任务执行
        await Task.Delay(1000);
        Log.Information("Hello world from Hangfire in Recurring mode!");
        Log.Information($"stop time: {DateTime.Now}");
        return true;
    }
}
在Program.cs中使用Cron来注册任务:
builder.Services.AddTransient<IJob, Job>();
// ...
var app = builder.Build();
// ...
var JobService = app.Services.GetRequiredService<IJob>();
// Recurring job
RecurringJob.AddOrUpdate("Run every minute", () => JobService.RunJob(), "* * * * *");
Run
控制台输出:
info: Hangfire.BackgroundJobServer[0]
Starting Hangfire Server using job storage: 'Hangfire.MemoryStorage.MemoryStorage'
info: Hangfire.BackgroundJobServer[0]
Using the following options for Hangfire Server:
Worker count: 20
Listening queues: 'default'
Shutdown timeout: 00:00:15
Schedule polling interval: 00:00:15
info: Hangfire.Server.BackgroundServerProcess[0]
Server b8d0de54-caee-4c5e-86f5-e79a47fad51f successfully announced in 11.1236 ms
info: Hangfire.Server.BackgroundServerProcess[0]
Server b8d0de54-caee-4c5e-86f5-e79a47fad51f is starting the registered dispatchers: ServerWatchdog, ServerJobCancellationWatcher, ExpirationManager, CountersAggregator, Worker, DelayedJobScheduler, RecurringJobScheduler...
info: Hangfire.Server.BackgroundServerProcess[0]
Server b8d0de54-caee-4c5e-86f5-e79a47fad51f all the dispatchers started
Hello world from Hangfire with Fire and Forget job!
Hello world from Hangfire using continuous job!
info: Microsoft.Hosting.Lifetime[14]
Now listening on: https://localhost:7295
info: Microsoft.Hosting.Lifetime[14]
Now listening on: http://localhost:5121
info: Microsoft.Hosting.Lifetime[0]
Application started. Press Ctrl+C to shut down.
info: Microsoft.Hosting.Lifetime[0]
Hosting environment: Development
info: Microsoft.Hosting.Lifetime[0]
Content root path: /Users/yu.li1/Projects/asinta/Net6Demo/HelloHangfire/HelloHangfire/
[16:56:14 INF] start time: 02/25/2022 16:56:14
[16:57:14 INF] start time: 02/25/2022 16:57:14
[16:57:34 INF] Hello world from Hangfire in Recurring mode!
[16:57:34 INF] stop time: 02/25/2022 16:57:34
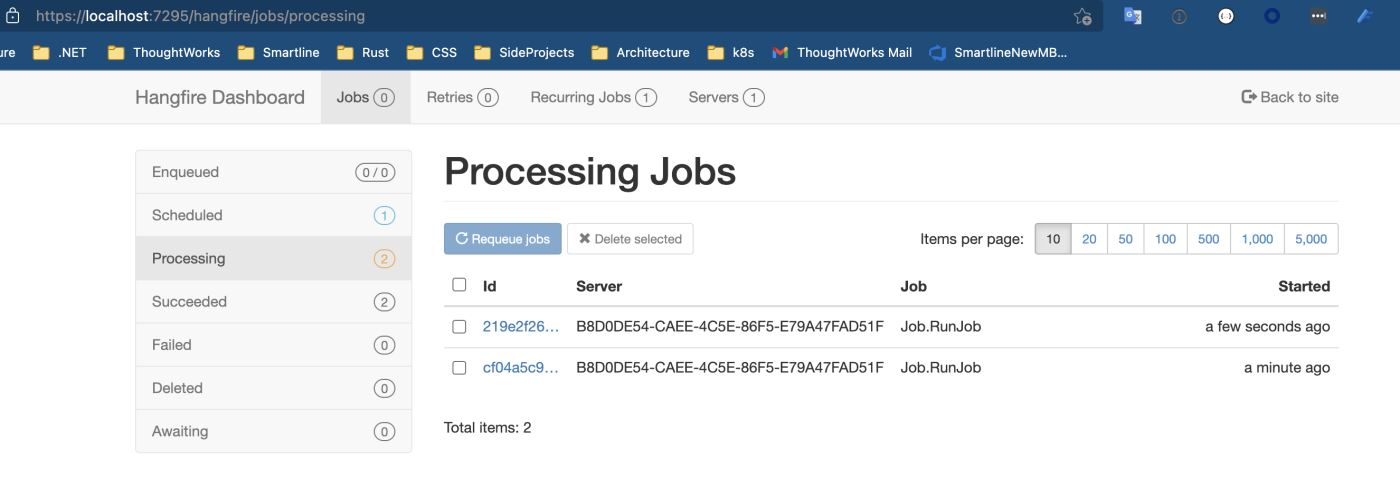
通过配置的dashboard来查看所有的job运行的状况:

长时间运行任务的并发控制???
从上面的控制台日志可以看出来,使用Hangfire进行周期性任务触发的时候,如果执行时间大于执行的间隔周期,会产生任务的并发。如果我们不希望任务并发,可以在配置并发数量的时候配置成1,或者在任务内部去判断当前是否有相同的任务正在执行,如果有则停止继续执行。但是这样也无法避免由于执行时间过长导致的周期间隔不起作用的问题,比如我们希望不管在任务执行多久的情况下,前后两次激活都有一个固定的间隔时间,这样的实现方法我还没有试出来。有知道怎么做的小伙伴麻烦说一下经验。
Job Filter记录Job的全部事件
有的时候我们希望记录Job运行生命周期内的所有事件,可以参考官方文档:Using job filters来实现该需求。
参考文章
关于Hangfire更加详细和生产环境的使用,张队写过一篇文章:Hangfire项目实践分享。
到此这篇关于使用Hangfire+.NET 6实现定时任务管理的文章就介绍到这了,更多相关.NET 定时任务管理内容请搜索以前的文章或继续浏览下面的相关文章希望大家以后多多支持!

 网公网安备
网公网安备